Your basket is empty.

Added to Basket
ffb52dab65d5aad948c9be561cc223ac

Violin Care page two

Violin Sound Post

It is not without good reason that the French word for sound post is "Ame" which means soul. The sound post is indeed the "soul" of the instrument, even a slight change in position of a couple of millimetres can alter the quality of the tone. A much simplified example is that the soundpost should stand vertical just behind the right hand (treble side) bridge foot, and inline with the outside edge of the bridge foot. A position nearer the treble side will give a somewhat brighter tone whereas nearer to the bass will produce a deeper tone. With regard to the position along the length of the violin, it should be nearer to the bridge on an instrument with a thin top and conversely further back if the top is quite thick. A good starting position is two to three millimetres behind the bridge. If you have an instrument with a rather acid or sharp tone, try moving the soundpost back a little, to perhaps four millimetre behind the bridge. It is very important that the ends of the soundpost fit the curvature of both the back and front and that the sound post is not too tight, it should just stand but without being forced into position. Many a violin has been damaged by an ill fitting soundpost, sometimes resulting in cracks in the belly or back of the instrument! So if you intend to try to fit or modify a soundpost, please be aware of the above warning.


How to fit.
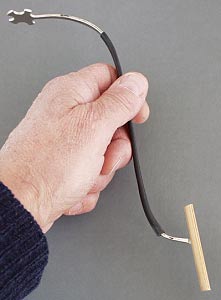
Assuming you are refitting the existing sound post rather than making a new one, all you will need is a sound post setter, please don't try to use other tools! They only damage the F holes. I have seen many a sound post with tell tale bits of thread tied to them often accompanied by F hole damage, the result of an attempt to fit the soundpost with the wrong tools. A soundpost setter is a very simple tool see photo. I do appreciate that very few of you will have one to hand and therefore I will explain how to make a setter that will do the job admirably.


All you need to make the setter is a stiff wire coat hanger, a pair of pliers and a file. Cut a length of wire from the coat hanger about 10 inches long (25 cm.), and using the pliers bend it into the approximate shape of the setter example. The lower end, on which is impaled the sound post, needs to be filed to, if possible to a small blade profile, but if this presents a problem it will work with just a point. The blade (or point) is then pushed into the soundpost slightly above the mid point of its length and in the same direction as the grain of the soundpost. See sound post below.

Violin postsetter
Violin soundpost
An important note on grain orientation.
The grain of the soundpost as viewed from either end is alligned ACROSS the violin, that is,
at right angles to the grain direction of the belly which is along the length of the instrument.

Now the tricky bit!
If you have not already done so, release the tension on the strings so that they have just enough tension to hold the bridge in position.
With the sound post impaled on the setter, introduce it carefully through the right hand F hole (treble side). Don't attempt to stand the sound post upright until it is in the centre of the violin where the height is greatest, Once you have it upright gently move it towards the treble side, paying attention to where you want it to finally be, with regard to distance behind the bridge foot. It should just stand without needing undue pressure, and should be vertical in both planes; a small adjustment to either the top or bottom of the post can be made with the other end of the setter (I bet you wondered what the curly bit was for?). If it is not right, knock it over, retrieve it and try again. Be prepared to make several attempts: it is quite tricky but can be done with practice!

There is another usefull tool available, shaped a bit like a pair of flat grips with the jaws curved. They are inserted through the sound hole on the bass side, it is then used to hold the base of the soundpost when in position in order to make fine adjustments to the top. It can also be used to retrieve the soundpost by gripping it at the base and guiding it up through the treble sound hole. If you can invest in a good post setter and the grips you will find fitting and retrieving a soundpost is and easy skill to master.