Violin care

You need to be aware of the following points to maintain
your violin in good playable condition.

 
Tuning
Even if your violin has adjusters fitted to the tailpiece you will need to tune with the pegs from time to time. tailpiece adjusters are for fine adjustment and should be slackened off every so often ( before they are wound down so far that they touch the front of the violin under the tailpiece!) The wooden pegs are tapered and therefore to tune using a peg requires a turning action combined with a gentle but firm sideways pressure to keep the taper snugly seated otherwise it will slip! Unless you are tensioning new strings a small amount of turning is all that is needed.
Peg maintenance
Tight pegs
If you find your pegs becoming stiff with a jerky movement so that you end up tuning above or below the note but never quite seem to be able to find the right spot it is time for some lubrication (and I don't mean a glass of red wine!) Let the string down gently and remove the peg. Take a small piece of hard dry soap (the sort of piece you would normally throw away is ideal) and put a small smear on the two places where it passes through the peg box, don't over do it ! Then turn it a few times in it's hole before replacing the string, if you have been frugal with the soap it will have corrected the problem, if you over did the soaping, well ... move on to the next section.
Slipping pegs
Remove the peg as described above and apply some ordinary chalk (blackboard chalk) to the parts of the peg that seat in the peg box, they usually show up as shiny bands around the peg. You will need to be more generous with chalk than soap, better than chalk is artists pastel, it is not quite so harsh and has the added advantage of being able to find a good colour match. Sometimes pegs will require both treatments.
Changing strings
If you are replacing the whole set, just change one string at a time this is much better for the violin as it avoids drastic alterations in tension. If you have tailpiece adjusters fitted be careful how you fit the string through the adjuster, it is easy to damage the string, there is not much room to spare. Please see our strings information page for more comprehensive fitting instructions together with lots of information on many of the different types available.
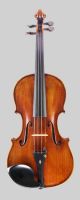
The bridge
The bridge is the most important fitting on the exterior of the violin and on its shape, height, position and angle depends to a great extent the sound of your violin. It is not fixed in position but is only held in place by the tension of the strings passing over its top edge. A violin maker or restorer aims to make a bridge which will transmit the most vibration energy from the strings to the body. This vibration is transmitted through the bridge and sound post to the body of the violin (mainly the top and back), which allows the sound to effectively radiate into the air. The body of the violin acts as a "sound box" to amplify the sound of the vibrating strings and make them audible. (In reality, there is no "amplification": the vibrating top and back plates of the body simply increase the loudness of the sound since they have a larger surface area.
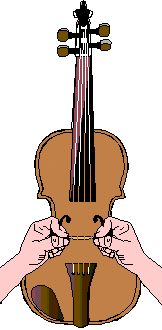
When you purchase your violin the bridge should be in the correct position however if you need to place it, align the feet of the bridge between the two small nicks on the inside of the two "F" holes, Important! Every time you tune using the pegs the top of the bridge moves a small amount towards the pegs, it is a small amount and so not usually noticed, however if this movement is left unchecked it will eventually lead to a warped or broken bridge or worst of all the bridge will suddenly collapse forward with considerable force causing possible damage to the violin.
The correct angle is set by looking from the side, the bridge should make a right angle (90 degrees) between the back of the bridge and the flat part of the belly behind the bridge. (see diagram)
 

  Correcting the bridge angle If the bridge angle needs correcting you will need to lay the violin down on its back on a cloth or alternatively you can leave it in its case for support. Rest your hands just above the widest part of the violin and grip the bridge between thumb and index finger or thumb and middle finger
(see diagram). Then ease the top part of the bridge back towards the tailpiece until the correct angle is obtained. You will find quite a lot of pressure is required to move the bridge but it must be done in a controlled way so that the bridge moves as a whole without altering the placement of the feet.
Tailgut
The modern replacement for tailgut is made of nylon, if you have an original tailgut fitted and it is either frayed or stretched you should have it replaced with a new nylon one. They are very easy to fit , the modern replacements have small threaded endpieces that just require tightening. The length should be such that the very end of the tailpiece is just in line with the highest point of the saddle, (this is the piece of ebony or rosewood where the tailgut passes over the end of the violin). You will find it stretches a small amount after fitting.
Chinrest  
The chinrest is a modern useful addition to the violin, it doesn't require any maintenance but it is worth noting its position on the body of the instrument. A lot of chin rests are fitted close to or even straddling the tailpiece. Check to make sure it is not actually touching the tailpiece at any point as this can cause buzzes or even a reduction in resonance or tone in some cases.
Sound Post
It is not without good reason that the French word for sound post is "Ame" which means soul. The sound post is indeed the "soul" of the instrument, even a slight change in position of a couple of millimetres can alter the quality of the tone. A much simplified example is that the soundpost should stand vertical just behind the right hand (treble side) bridge foot, and inline with the outside edge of the bridge foot. A position nearer the treble side will give a somewhat brighter tone whereas nearer to the bass will produce a deeper tone. With regard to the position along the length of the violin, it should be nearer to the bridge on an instrument with a thin top and conversely further back if the top is quite thick. A good starting position is two to three millimetres behind the bridge. If you have an instrument with a rather acid or sharp tone, try moving the soundpost back a little, to perhaps four millimetre behind the bridge.

It is very important that the ends of the soundpost fit the curvature of both the back and front and that the sound post is not too tight, it should just stand but without being forced into position. Many a violin has been damaged by an ill fitting soundpost, sometimes resulting in cracks in the belly or back of the instrument! So if you intend to try to fit or modify a soundpost, please be aware of the above warning.


How to fit.
Assuming you are refitting the existing sound post rather than making a new one, all you will need is a sound post setter, please don't try to use other tools! They only damage the F holes. I have seen many a sound post with tell tale bits of thread tied to them often accompanied by F hole damage, the result of an attempt to fit the soundpost with the wrong tools. A soundpost setter is a very simple tool see photo. I do appreciate that very few of you will have one to hand and therefore I will explain how to make a setter that will do the job admirably.

All you need to make the setter is a stiff wire coat hanger, a pair of pliers and a file. Cut a length of wire from the coat hanger about 10 inches long (25 cm.), and using the pliers bend it into the approximate shape of the setter example. The lower end, on which is impaled the sound post, needs to be filed to, if possible to a small blade profile, but if this presents a problem it will work with just a point. The blade (or point) is then pushed into the soundpost slightly above the mid point of its length and in the same direction as the grain of the soundpost. See sound post below.
An important note on grain orientation.
The grain of the soundpost as viewed from either end is alligned ACROSS the violin, that is, at right angles to the grain direction of the belly which is along the length of the instrument.

Now the tricky bit!
If you have not already done so, release the tension on the strings so that they have just enough tension to hold the bridge in position.
With the sound post impaled on the setter, introduce it carefully through the right hand F hole (treble side). Don't attempt to stand the sound post upright until it is in the centre of the violin where the height is greatest, Once you have it upright gently move it towards the treble side, paying attention to where you want it to finally be, with regard to distance behind the bridge foot. It should just stand without needing undue pressure, and should be vertical in both planes; a small adjustment to either the top or bottom of the post can be made with the other end of the setter (I bet you wondered what the curly bit was for?). If it is not right, knock it over, retrieve it and try again. Be prepared to make several attempts: it is quite tricky but can be done with practice!

Lower Price Violins | Mid Price Violins | Fine Quality Violins | Return to Store | Shopping Cart | Payment Information | Shipping Information | Contact Us


Return to
Japanese page.